Homemade Hydroponic System For Cannabis
UncategorizedLooking how to grow hydroponic marijuana at home? Looking to make your own homemade hydroponic system for weed but don’t want to spend hundreds of dollars? Here’s the guide you were looking for to make your own hydroponic system for cheap! Now, there are a lot of different hydroponic systems you can build but in this guide, we’ll teach you how to make your own DWC setup which requires very little time and effort. So if you’re looking to set a hydroponic system at home, read along!
1. What is the Best Hydro System for Beginners?
DWC is probably the best hydroponic system for beginners because of the lack of moving parts. In this type of system, the nutrient solution does not move from one reservoir to another, the nutrient solution stays sitting in the hydro setup from seed to harvest.
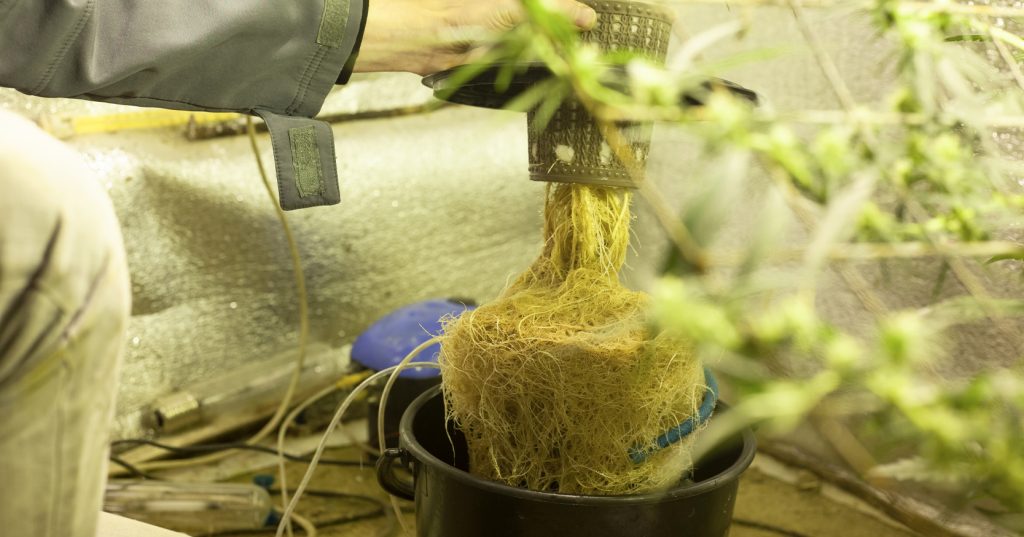
In soil, the soil provides the space needed for roots to get the oxygen they need but in hydro systems, the roots grow directly in the nutrient solution so in order to provide oxygen to the roots you must oxygenate the nutrient solution with an air stone.
2. Do Plants In Hydro Really Grow faster?
In general, yes. Growing hydroponically consists of growing your plants directly in the nutrient solution where they have the perfect amount of nutrients, so the roots don’t have to spend energy growing in order to look for food. Also, hydroponic nutrients are readily available for absorption so the plants don’t have to break down the nutrients, saving even more energy.
This happens because the media used in this type of grow system allows for more oxygenation in the root zone, promoting better root growth and nutrient absorption. So all of this in combination with the right growing conditions can result in bigger plants and consequently bigger yields 30-50% faster than in soil, for example.
3. Pros and Cons of Growing Cannabis Hydroponically
Apart from growing faster and yielding more, there are several other benefits when talking about growing hydroponically but there are also a couple of disadvantages. Make sure to know them all so you avoid surprises weeks into your grow cycle!
3.1. Pros of growing in Hydro
- Faster nutrient absorption
Despite being a bit hard to mix the right nutrient solution, it’s much simpler to feed your plants due to the roots growing directly in an oxygenated nutrient solution. Meaning that everything your plants need to grow is readily available, resulting in much faster nutrient absorption and plant growth.
- Reduces chances of dealing with pests
Keep in mind that reduces chances does not mean that you will be 100% protected from pests but it is true that most bugs need organic matter to grow and reproduce (such as soil or coco fiber) so growing soilless will make it less likely for you to deal with pests or bugs, just remember to always keep everything clean no matter what.
- Grow more in less space
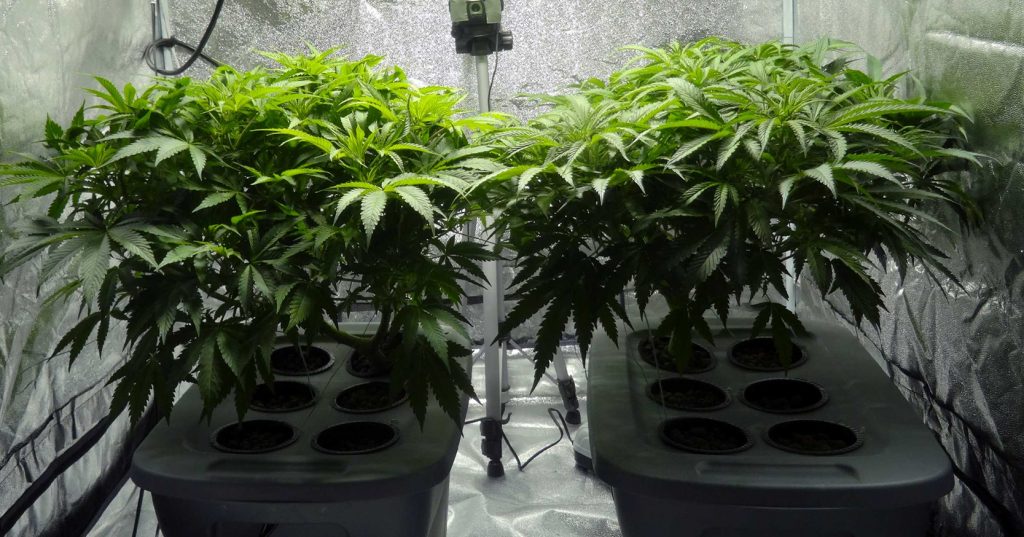
Hydro systems make it possible for you to grow more plants in less space due to the ability to grow 3 plants or more in just one hydro system. So depending on how you do it you can grow more plants and get better yields in less or the same space as you would with other growing methods.
3.2. Cons of growing in Hydro
- Initial cost
Setting up a hydro system can be very expensive if you’re planning on growing a lot of plants. It doesn’t matter if you’re going big or small, a hydro system will always be more expensive than growing in a simple plastic pot. Although the extra cost is definitely worth it, it may be a huge disadvantage for some growers.
- Learn the basics
Despite being relatively simple to build your own hydro system, growing hydroponically can be difficult if you’re a beginner, especially if you’ve never grown cannabis before so you should check on your hydro setup 3-5 times a day until you learn the do’s and don’ts and feel more comfortable.
- Equipment failure
This is probably the worst disadvantage. Growing hydroponically depends on an air pump and air stone oxygenating your nutrient solution so a power outage or an equipment failure could kill your plants in a matter of hours so depending on the number of plants, it may be a good idea to buy a small generator to keep things going during a power outage and buy 2 pieces of each in case your air pump or air stone stop working.
4. How to Make a Hydroponic System at Home Step-by-Step
Now that you know why you’re choosing this type of homemade hydroponic system for marijuana, it’s time to start building it. So here’s what you’ll need:
- Bucket (for 1 plant) or storage box (for 3 plants or more);
- Net pots and;
- Airstone and air pump.
Step 1
The first step is to find the right container. If you’re growing just one plant you can use a 30-liter bucket and if you’re growing more you can use a 100-liter storage box. Just remember that ppm and pH fluctuations are more likely to happen in shallow reservoirs so remember, the deeper the better.
Also, remember that light should not be able to reach the roots because algae can develop inside the hydro setup so go for opaque reservoirs or use a black plastic sheet to make your system lightproof.
Step 2
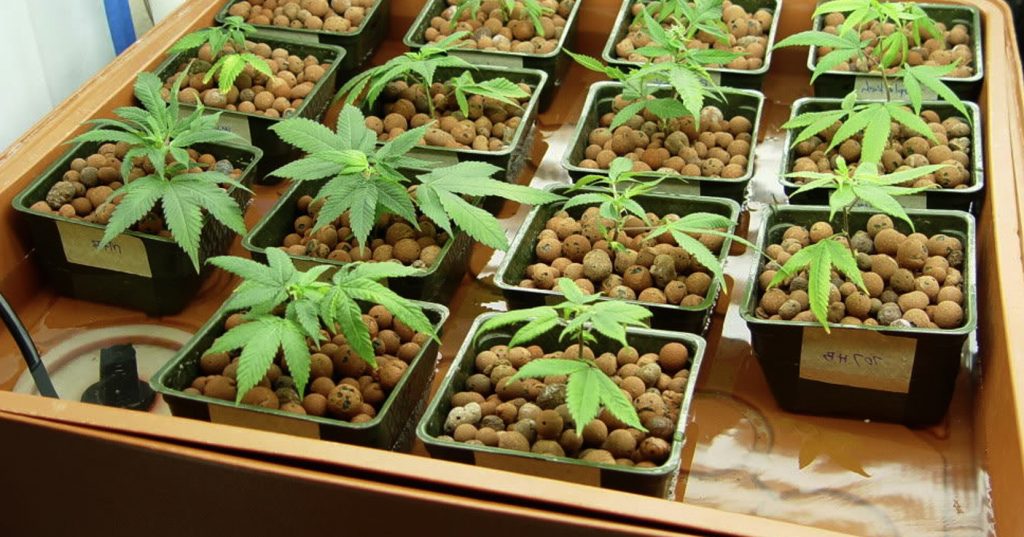
The second step is to make the holes on the lid of the reservoir. It doesn’t matter if you’re growing 1 or 3 or 10 plants, you will need to make holes into the lid with a drill or saw in order to place the net pots. These net pots have holes at the bottom for the roots to grow through and are what will hold your plants so make sure the net pots are larger than the holes so they don’t fall through accidentally. As for the holes, if you’re growing 3 plants or more, the holes should be 15 centimeters apart and if you’re growing just 1 plant, make sure the hole is in the center of the bucket.
Step 3
The third step is to grab the air pump and assemble it. Remember that the air pump must remain outside the hydro system. Make sure the air pump comes with a valve that ensures water does not come back up when it’s turned off. If your pump does not come with a check valve, make sure to keep the air pump above water level. So connect the air pump to the air stone making sure the arrow on the valve faces the air stone and not the air pump, this arrow will tell you the direction of the air when the air pump is turned on so make sure it’s facing the correct direction.
Step 4
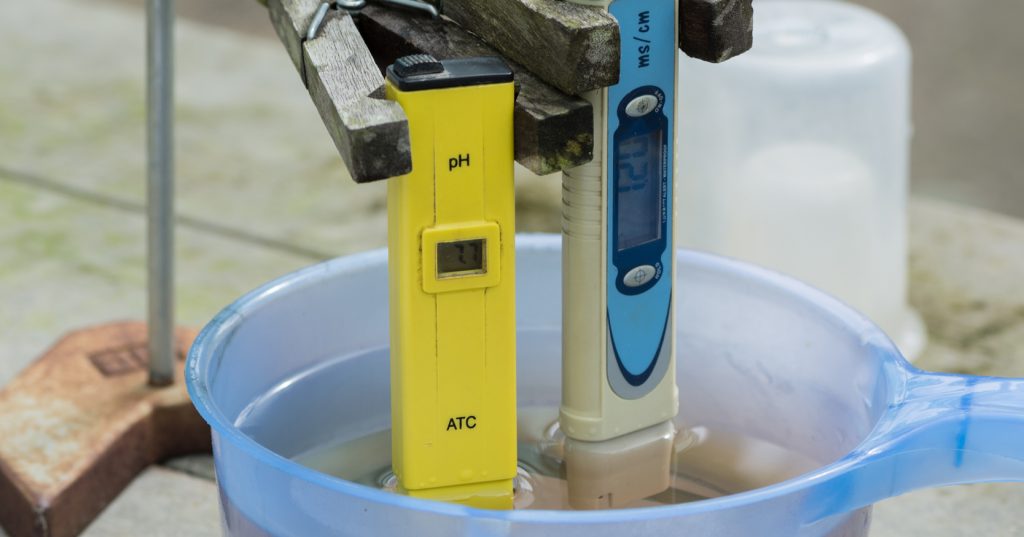
The fourth step is to mix the nutrient solution. Before mixing the nutrient solution remember that the system will be extremely heavy when full so before mixing the nutrient solution decide where you want to place the hydro system and only then fill it with water, leaving 2-3 centimeters of space at the top. Once the system is filled with water, mix the nutrient solution in the reservoir by following the manufacturer’s recommendations.It’s essential to check and adjust the pH of the nutrient solution, so use a pH meter to measure it and adjust it to 5.5 – 6.5. If the nutrient solution is not within the advised range, use any pH Down or pH Up solution to adjust your nutrient solution.
Step 5
The fifth step is to assemble everything. So make sure the air pump is plugged in and place the air stone in the reservoir, then place the lid. Once everything is in place and ready, fill the net pots with either perlite, Rockwool, or clay pellets and you’re all set to start growing cannabis hydroponically!
5. Basic Maintenance
Even though most of the work is done, hydroponic systems need maintenance in order to keep your plants growing properly. So there are 3 things you must do regularly if you want to grow healthy cannabis plants:
- Make sure the water level doesn’t drop. Roots should be in contact with the nutrient solution at all times, especially during the first 2-3 weeks.
- Check pH levels at least once a day (preferably 3 times per day). Also, remember to always check and adjust the pH every time you’re adding more nutrient solution to the reservoir.
- Remember to clean the reservoir and replace the nutrient solution every 2 to 3 weeks.
6. FAQs
Can I germinate directly in the hydro system?
Yes, for sure. But seeds need to be kept moist at all times so it’s recommended to place a Rockwool plug on top of the medium of choice. The Rockwool cube will ensure your seed does not dry up.
Can I use this system for clones?
Obviously! In order to keep cuttings in this type of system, make sure to use a foam or sponge circle with a slit in the middle to place the clones in. Then, remove the lower branches or leaves (kinda like lollipopping) to make sure your cuttings redirect the energy to the roots and top growth.
Is hydro really better than soil?
There’s no correct answer for this question because it depends on what the grower wants to achieve and the means he has to get the desired results. But in general, it’s considered that hydro results in better yields while soil results in better tasting flowers.
How can I replace the nutrient solution?
Depending on the hydro system, replacing the nutrient solution may become a laborious task so it’s highly recommended to use a water transfer pump (usually used for aquariums). Another tip is to go for battery-operated pumps which will make your job much, much easier.
Is there an optimal temperature for the nutrient solution?
Well, if the growing conditions are on point the nutrient solution should be fine. But if your growing conditions are out of range it’s vital you ensure the nutrient solution ranges between 15 °C to 23 °C. These are the ideal temperatures because a cooler nutrient solution can hold more oxygen and can prevent harmful organisms from growing inside the reservoir. Now, you can grow hydroponically in warmer temperatures but make sure to keep everything clean to avoid issues such as root rot, for example.