Aeroponic Cannabis Setup
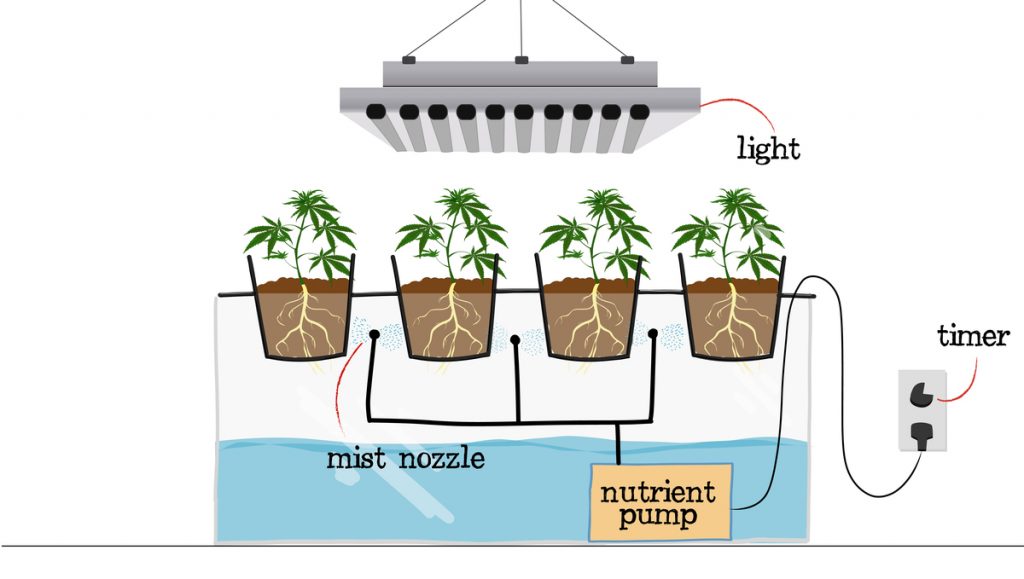
UncategorizedJust like hydroponics, an aeroponic cannabis system does not use soil (or any other substrate or media). Instead, this type of cannabis grow system consists of suspending cannabis plants in an enclosed environment, where the roots are exposed. The roots are misted with a nutrient solution that comes out of high-pressured mist nozzles at the bottom of the setup. For optimal growth, the plants get misted with a nutrient solution 24/7, which results in much faster plant growth.
1. What Is Aeroponics?
Aeroponics weed growing is a method in which the plant’s roots grow in aeroponic pots and are suspended inside a reservoir (similar to the reservoir used in DWC setups) where they are sprayed with a nutrient solution. This type of aeroponic cannabis system is most commonly used by growers to start clones and let them develop healthy roots before transferring them to soil or coco fiber or any other medium, although it can be used to grow plants from seed to harvest without a problem at all.
The aeroponics method was first created back in 1950 in an attempt to study plant roots in general but has then become super popular, especially when dealing with cannabis clones.
1.1 Pros and Cons of Cannabis Aeroponics
Pros of DWC
- An aeroponic system allows growers to reduce pesticide usage due to not using organic matter as a substrate, so as long as you keep the system clean, it’s most likely you won’t have to deal with pests.
- An aeroponic weed system also makes it possible to grow more plants in the same grow space because the nutrient solution is being delivered directly to the roots, so they don’t need to grow much and don’t need to fight for space. Also, aeroponic cannabis yields more, so you’re getting a bigger harvest in the same grow space.
- Aeroponic cannabis growing is also super efficient, so plants grown aeroponically usually grow bigger and faster than substrate-based methods, taking up to 4 weeks less.
- Due to recycling the water and nutrients, you can save a lot of water and nutrients when growing aeroponically.
Cons of DWC
- Due to the little information available and equipment needed, aeroponics is probably the most expensive way to grow cannabis.
- In order to minimize plant growth issues, your plants need to receive the nutrient solution constantly so it’s essential you have a backup power source in case of a power outage.
- Failing to replenish the nutrient solution reservoir or a water leak can end up killing your plants in 1-3 hours, so you need to monitor your aeroponic system constantly.
- Aeroponic marijuana is not for beginners as you must be knowledgeable about cannabis plants and this type of system.
2. How Do Aeroponics Cannabis Systems Work?
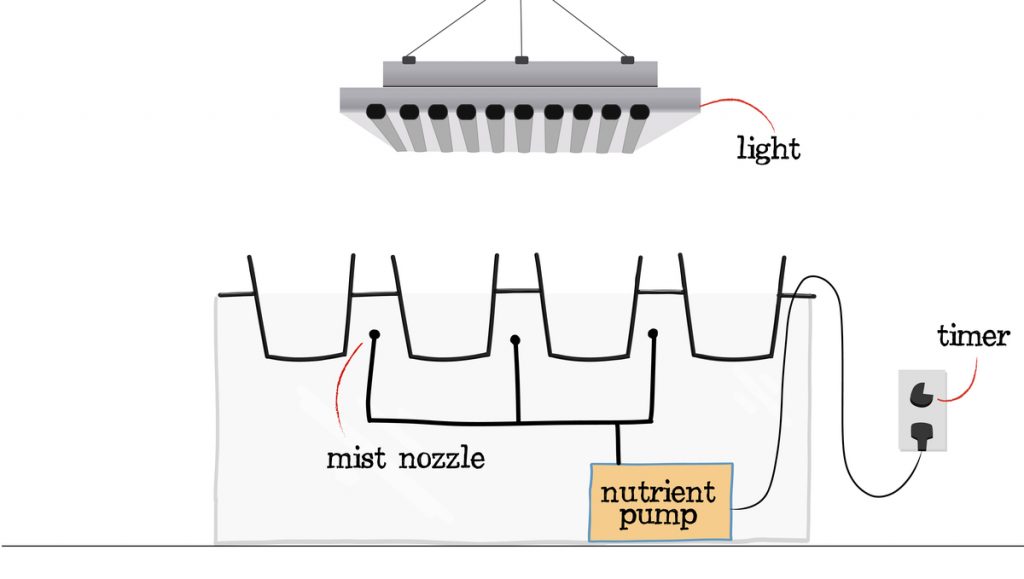
Because the roots are suspended in mid-air, the roots get their oxygen from the environment and there’s no need to oxygenate the nutrient solution, you only need to provide water and nutrients via misting and that’s it. Obviously, you still need light, but when talking about the system itself, you only need to get the roots wet in order for your plants to grow.
Basically, this type of system consists of:
- A misting system;
- A bucket or tote to hold the nutrient solution and where the pots and the misting system will be placed.
- A timer and;
- A water pump that makes the misting system work.
So if you don’t want to buy a store-bought system but still grow cannabis in the best aeroponic system for weed, read along!
3. 20-Liter Bucket Aeroponic Cannabis Guide
Now that you know what you need to grow great aeroponic cannabis, it’s time to build your own aeroponic cannabis system! You’ll need:
- 20-liter bucket with a lid;
- Cut-off threaded poly riser,
- 360 degree plastic misting nozzle;
- Digital timer with 30 min increments;
- Net pots.
As you can see, it’s not very expensive to build your own aeroponic system but be prepared because you’ll also need the following tools:
- A hand saw;
- Sharpie and;
- Drill and hole saw;
And make sure you have safety glasses, just to avoid any possible problems. So let’s start!
Step 1 – Make holes in the lid
Grab the hole saw and make one hole per plant on the lid of the bucket. For a 20-liter bucket it’s only recommended to grow 1 or 2 plants but if you grow in a 100-200-liter tote, you can make a total of 6-8 holes, dependin on the size of the reservoir.
Step 2 – Place aeroponic pots
Place the aeroponic net pots in the holes you just drilled on the bucket lid and make sure the pot nets fit snugly.
Step 3 – Set up the pump
Once the nets are in place, carefully put the threaded poly riser on the hydroponic pumo and place the pump at the bottom of the bucket. Ensure the poly riser is at the desired height and add the 360 misting nozzle. Remember that the pump should stay in place at all times, so it’s recommended to go with pumps with suction cups to help you with that.
Step 4 – Connect everything
Run the pump plug cord through one of the pot holes (or make a smaller hole for the plug) and plug it into the timer, setting the timer for 30min On and 30min OFF. Meaning that you’ll be misting the roots for 30 min then let them dry off for 30 min.
This may vary according to your growiong conditions and equipment, so make sure to adjust it. Keep in mind that the longer the misting period, the longer the dry off period should be. So if you don’t feel comfortable leaving your plants without misting for 30 minutes, you can always spray for 3 – 15 seconds every 1 to 5 minutes with great results, but remember that it’s a matter of adjusting the misting periods.
Once everything is in place, fill it with around 8 liters of water and test it out, if everything works correctly then you can start growing cannabis aeroponically!
4. Plant Grow Guide In Aeroponics
Now that your aeroponic system is up and running, it’s time to start growing but before germinating the seeds, it’s important you take a couple of things into consideration.
4.1. Aeroponic Cannabis Water
Due to the roots being directly exposed to the water and nutrient solution, the pH, temperature and how often you change the water is extremely important. The pH should range between 5.5 – 6.5 and the water temperature should be between 18 – 24 °C.
You may want to start with distilled water or, at minimum, use tap water but leave it outside for 24 hours for the chlorine to evaporate.
It’s recommended to have an extra reservoir with water readily available in case of an emergency. Remember taht the water reservoir should not be clear because it may cause algae to appear, which can clog your whole system.
4.2. Aeroponic Cannabis Feeding
It doesn’t matter if you opt for organic or synthetic nutrients, remember that less is more so always start with ¼ of the recommended amount and slowly increase the amount as your plants grow. But, this way isn’t very precise, so if possible, go for an EC or TDS meter.
4.3. Aeroponic Cannabis Lighting
When choosing your lights, you need to keep in mind the temperature. This happens because lights emit heat and can raise water temperature so it’s recommended to go for LEDs (when possible) due to HPS light bulbs emitting much more heat, although you can used HPS bulbs without a problem at all as long as you can maintain good growing conditions.
4.4. Aeroponic Cannabis Growing Conditions
Keeping the growing conditions in rage is vital when growing aeroponically, this is why you should choose the best grow light for your aeroponic cannabis setup. For ideal growth, the temperature should range between 21 – 24 °C. If you’re having trouble maintaining the right gowing conditions, you can always use oscillating fans or exhaust fans to pull cooler air and CO2 into your grow room.
Also, it’s super important to keep in mind the smell, as your plants will probably grow much bigger and yield more, and smell more also. So remember to have a carbon filter ready if you don’t want to attract unwanted attention!
5. Important to Keep In Mind
If growing with synthetic fertilizers, remember to change the nutrient solution regularly to prevent salt buildup and avoid nutrient lock. Also, always follow the manufacturer’s recommendations and always monitor nutrients, pH and growing conditions.
And last but not least, remember to dispose of the nutrient solution properly. Do not dump it in street drains, for example, because those drains usually take water to rivers which will end up polluting it so make sure to filter out the impurities or look for the correct way to disposed of this type of waste.